Michael Buckbee
26 Nov 2023
If you’re reading this, it’s most likely you’re in one of two groups of developers:
If you’re in the second group jump ahead and install Wafris.
If you’re interested in implementing your own rate limiting for your app or API, read on.
In roughly the same way you might gently nudge a junior developer out of attempting to write their own data store from scratch instead of just any existing database server, I feel like it’s my responsibility to at least mention that a whole category of already built open-source applications and SaaS services exists solely to murder the heck out of the “How do we put usage limits on our API?” problem.
A whole category of already built open-source applications and SaaS services exists solely to murder the heck out of the “How do we put usage limits on our API?” problem.
These are referred to as API Gateways, and in general, they work as a reverse proxy that handles traffic ahead of your application server that:
Creates, revokes, and tracks API keys Manages API plan limits (ex: “100 requests per minute per API key”)
If a request hits the API Gateway with a valid API key and is within the plan limits, it then passes that request back to your actual application server.
Most API rate limits are put in place to either shape usage or prevent abuse on two axes:
Usage limits are any rules intended to track how much an API is called over a time period.
These are usually:
Consider an email-sending API service like Mailgun.
Businesses know how many email subscribers they have and how often they send emails, and can easily calculate their typical usage.

Throughput limits are typically intended to prevent abuse of underlying resources.
Generally, they’re trying to:
Consider an API that’s reformatting and resizing image uploads. Each API invocation burns server compute cycles, and too many at once could grind the entire service to a halt.
Throughput limits like "10 file uploads per second" help prevent downtime scenarios.
In truth, the lines between usage and throughput limits are incredibly blurred, and what you define them as has much more to do with the type of API you’re implementing than any arbitrary standard.
What’s important, though, is that as you design the limits for your API, you’re considering both the upper usage and the lower throughput limits.
You need to consider both the upper usage and the lower throughput limits.
Doing so lets you "converge" the limits into a sensible set of rules that help prevent abuse and clearly guide clients' implementation design.
As part of your API design, you need to consider how you’re going to pass back to the clients:
The most common HTTP status codes used to communicate rate-limiting states are listed below. Using these status codes makes it easier for clients to code up API integrations as they can rely on the built-in utilities in HTTP libraries.
200 OK
The "200 OK" HTTP status code indicates a request has been successfully processed and falls within the allowed rate limits.
429 Too Many Requests
The HTTP status code "429 Too Many Requests" tells clients they've hit the rate limits and need to slow down or re-process their requests.
401 Unauthorized
A "401 Unauthorized" generally indicates that the client's request lacks proper authentication. This is the correct response to return for an API if the API key is wrong or has been revoked.
HTTP Response headers are returned with each request. They are often used to communicate back to the client usage information as to the current usage status.
An example:
HTTP/1.1 200 OK
Content-Type: application/json
X-RateLimit-Limit: 1000
X-RateLimit-Remaining: 750
X-RateLimit-Reset: 1638120000
In this example:
X-RateLimit-Limit specifies the total limit of requests allowed within a specific time frame (e.g., 1000).
X-RateLimit-Remaining indicates how many requests are still available within the current time frame (e.g., 750 remaining).
X-RateLimit-Reset denotes the timestamp when the rate limits will reset, usually represented in Unix epoch time (e.g., 1638120000, corresponding to a specific date and time).
Note: These headers aren't part of an official RFC, we're just choosing logical names that will describe what they represent. The `X` prefix on them indicates their unoffical status.
These headers provide valuable information to the client about their current usage and the rate limits imposed by the API.
This strategy is often used as it’s agnostic to whatever format the request body returns. Consider that the above could be used equally well for an API returning HTML, a PNG, a CSV, JSON, or XML.
For this reason it's what is most often used by API Gateways.
While you can return a response in the body itself, in most cases, it’s better to use HTTP response headers. However, if you’re already returning other data (in a JSON or XML response), it may be more convenient to include the usage data directly in the response body.
Example:
{
  "status": 200,
  "contentType": "application/json",
  "rateLimit": {
    "limit": 1000,
    "remaining": 750,
    "resetTime": 1638120000
  }
}
There are three common rate-limiting strategies in use today. Choosing which of these to use is much more about the usage patterns of your API and the data store that you are building your rate limiting.
To help in considering these, we’re going to use the same rate limit example across each:
Timestamps are expressed in Hour:Minute:Second (00:00:00) format in all examples.
In the fixed window rate limiting algorithm, requests can occur at a fixed rate within a defined time window.
To implement our rate limit of “100 requests a minute,” we would:
Create “windows” like
01:00:00 to 01:01:00
01:01:00 to 01:02:00
01:02:00 to 01:03:00
For each window and API Key, we would:
This implementation can work well if you have a single client making requests against the API, but it rapidly creates a “thundering herd” problem with multiple clients.

Consider two clients with distinct API keys pushing the API's limits.
Client A starts making requests at 01:00:25 and burns all of their requests in a second. Client B starts making requests at 01:00:45 and burns all of their requests in a second.
At 01:01:00, both rate-limiting windows for clients A and B expire, and at 01:00:01, the API is hit with 200 requests in a second.
Note: this problem of aligned expirations worsens as you expand the number of clients and the length of the rate-limiting window. Consider a monthly rate limit that’s holding back 1000 clients at the first second of the first minute of the first day of the month. There’s a massive spike in traffic that’s allowed through, possibly overwhelming the server.
The sliding window rate limiting algorithm also enforces a fixed rate limit but uses a sliding time window to measure request rates. It maintains a rolling window of time during which requests are counted.

When a request arrives, it increments the count for the current window and checks if it exceeds the limit. This approach provides more flexibility than fixed window rate limiting, as it adapts to varying traffic patterns and doesn't reset the count abruptly.
To implement our rate limit of "100 requests per minute," we use a sliding window approach like this:
Here's how this works in practice:
This sliding window approach prevents the "thundering herd" problem of aligned expirations in the fixed window rate limiting.
It ensures that clients are limited to 100 requests per minute, with the rate limit dynamically adapting to the traffic patterns within the rolling window.
The leaky bucket algorithm is a rate-limiting mechanism that smooths out the flow of requests over time and allows for multiple processing costs.
It’s not typically used for synchronous processes (like web requests) but is often used as part of a background or asynchronous job process.
It models the rate limit as a "bucket" that can hold a fixed number of tokens. Tokens are added to the bucket at a constant rate, and each API request consumes a token.

If the bucket is “full,” additional requests are queued. This algorithm allows for bursts of requests up to the bucket's capacity but maintains an average rate over time, making it a practical choice for controlling traffic and preventing resource exhaustion.
Note: while this algorithm describes “adding tokens to a bucket at a constant” rate - it’s not actually implemented as a process that iterates through each valid API key, incrementing their token counts.
It’s 1000x more performant and wildly less complex to track the current and last request timestamps instead and calculate how many tokens are used/added.
Here's how it works:
You start with a bucket of tokens and a fixed rate at which tokens are added to the bucket (e.g., 10 tokens per second). You also have a limit on the maximum number of tokens the bucket can hold.
A unique aspect of the Leaky Bucket algorithm is that the above can be modified to support multiple processing costs.
Consider an image and video processing API; within a single key and token price, you can implement a system where image processing costs 3 tokens and a video costs 10 tokens.
You’re better off using a Sliding Window rate limiting scheme in nearly every circumstance than a fixed one.
It’s still important to demonstrate why that’s the case and the reason is that you’re almost guaranteed to create the thundering herd problems mentioned earlier.
Consider the following pattern of five (labeled A through E) API clients :
| Client | Time | Fixed | Sliding |
|---|---|---|---|
| Client A | 0:01:10 | 100 | 100 |
| Client B | 0:01:20 | 100 | 100 |
| Client C | 0:01:30 | 100 | 100 |
| Client D | 0:01:40 | 100 | 100 |
| Client E | 0:01:50 | 100 | 100 |
| Clients ABCDE | 0:02:00 | 500 | 0 |
| Client A | 0:02:10 | 0 | 100 |
| Client B | 0:02:20 | 0 | 100 |
| Client C | 0:02:30 | 0 | 100 |
| Client D | 0:02:40 | 0 | 100 |
| Client E | 0:02:50 | 0 | 100 |
| Clients ABCDE | 0:03:00 | 500 | 0 |
| Client A | 0:03:10 | 0 | 100 |
| Client B | 0:03:20 | 0 | 100 |
| Client C | 0:03:30 | 0 | 100 |
| Client D | 0:03:40 | 0 | 100 |
| Client E | 0:03:50 | 0 | 100 |
| Clients ABCDE | 0:04:00 | 500 | 0 |
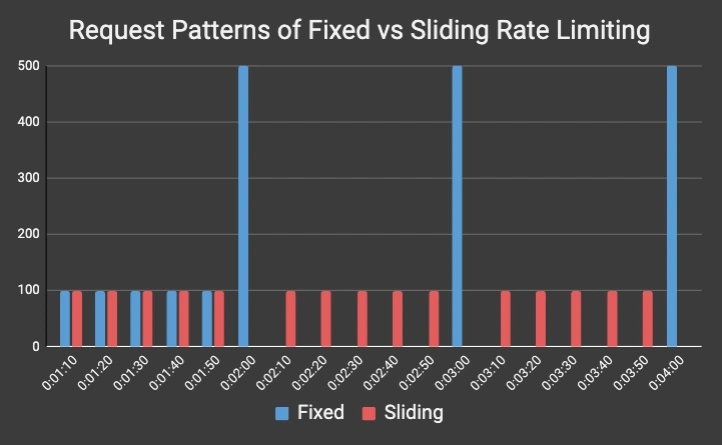
And in graph form:

The Fixed Window rate limiting shapes the request patterns into the spikes you see hitting at 02:00, 03:00, and 04:00 while the Sliding Window pattern allows for a much smoother and more steady flow of requests.
Our recommendation is to use Sliding Window rate limiting patterns for APIs with synchronous requests.
If you need to attribute various costs to different calls from a single API key and/or the calls are going to be processed asynchronously, consider the Leaky Bucket algorithm.
Lastly, if you’re having security issues with your site or API, please consider Wafris - our open-source Web Application Firewall that’s helped thwart millions of attacks.
Start blocking traffic in 4 minutes or less